This part of learning about Forensics tested everything that we have learned over the past few months. When we walked into the calssroom there were three rows. Each row had its own crime scene, my group and I were given an outdoor scene in which a decomposed body, three fingerprints, possible poison, a suicide letter, hair, fiber, two different footprints, and a syringe were found. Using these clues we had to determine a possible victim, and suspect from the line up that was presented on the board. When choosing the victims and suspects we had to be very careful because each suspect on the board was being used for all three crime scenes, this mean that the use of al of our evidence was extremely important.
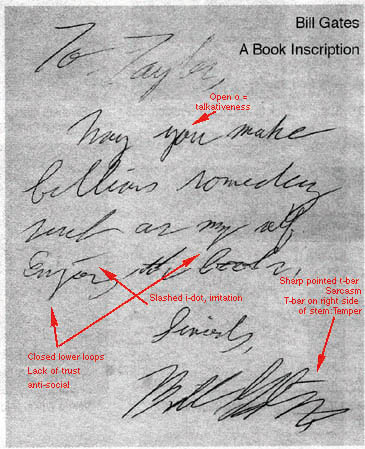
Saturday, December 3, 2011
Part IX: Crime Scene Investigation
Part VIII: Witness Experiment
When running an Investigation witness are a important part of the process. The witness experiment was designed as a way to determine if we could, like a witness, remember a face. In our groups we found pictures fo the same size, we then took the pictures and cut out the features, such as the lips and nose, we then mixed up the features. Using just our memories we had to recreate the face. This experiment was mean to teach how the witness part of a investigation works, to also give us an idea of how difficult it can be to remember the faces, and also to teach us the importance of remembering a witness and how this can affect a entire investigation.
Below are some images from the experiment.


Below are some images from the experiment.
Part VII:Create a Profile
In one day we were given, miscellaneuosly, a few pieces of evidence such as; a piece of hair, a fingerprint, anything that would be helpful when solving a crime.With the given materials we were told to come up with a scenario to explain what happend to the person. My group was given a fingerptint, a piece of paper that at first galnce, what appeared to be either some type of juice or lip gloss, and a letter that had been ripped. We peiced the letter together to find out what kind of letter it actually was and to determine what it said, the letter read; "You will never find her". Using the letter, fingerprint, and the liquid substance, which was determined to be juice, we came up with what we thought was a likely scenario, and then shared it with the group. My scenario was that a female was at her home drinking some type of juice, when she heard a knock at her door. She got up from the place that she was sitting and answered the door, based on the spilled juice it looks like a struggle took place. We thought that she probably knew the person at the door because she allowed them in, the fingerprint would be sent to the police department to be run through the machine to determine if it matched someone in the database. My scenario was based on facts and showed how a investigation might be carried out.
Friday, December 2, 2011
Part VI: Drug Analysis
History of Drug Analysis:
Drug Testing:

Toxicology tests or "Tox Screens" can be done through Blood tests, Urine tests, and Tissue samples. Each of these test can and will show the amount of a drug substance that a person has ingested, if any. When
Drug Testing Project:
In our lab class we were given a project in which we were given different substances that were meant to mimc different types of drugs. Using different types of indicators such as bromothymol blue, phenolphthalein, and ph paper, we were able to determine the ph of the different substances. The ph of the substance allowed us to determine if the substnace was in fact a drug. For example my group and I were given three samples that were suposed to be Aspirin, using Bromothymol blue and ph paper we tested to make sure that this was true, the bromothymol blue turned yellow indicating that it was a acid, bromothymol blue will turn green in nuetral substances, and blue in base solutions. Then using ph paper we indicated that the substance we were testing had a ph of 3, this means that it was an acid, using these two tests we were able to determine that the first substance was Aspirin but the other two samples were not. The Picture above shows all the chemicals (indicators) used to analyze the substances so that we could determine the type of drug and whether or not it was a drug.
Sources:
http://www.mshp.dps.mo.gov/MSHPWeb/PatrolDivisions/CLD/Toxicology/toxicology.html
http://www.trutv.com/library/crime/criminal_mind/forensics/toxicology/index.html
http://www.emeraldinsight.com/content_images/fig/0170950502002.png
http://www.bxscience.edu/publications/forensics/articles/toxicology/r-toxi01.htm
At the Age of the Enlightenment and the Rennisance the studies of Paracelsus and Orfila began to shape. Paracelsus determined that specific chemicals were responsible for the toxicity of plants and animals, he also determined that the efects on the human body by chemicals is dependent upon the dose. Orfila a Spanish physician is often credited for founding toxicology. The first person to use a cemical method for detecting poisons was Dr. Hermann Boerhaave. He would place sustances that were thought to contian poison on hot red coals and test for the smell to determine if the substances was in fact a chemical.

testing the blood from a body during a autopsy, the blood is generally taken from two places, the heart and the femoral vain that is in the leg. Blood is taken from both places because the concentration of the drugs can be different, by taking blood from the vein and the heart the accuracy of the tests are boosted. Urine samples can be taken if there is any left in the body, tissue samples are taken from many of the organs; including the liver, brain, and kidney. When the tissue sample has been taken it is placed in a specimen container so that screening can begin. There are gas there are three major types of toxicology test; Gas chromotography, mycrocrystalline, Spectrophotometry, but there are, of course, many other tests that I havent mentioned. Gas Chromotography is used to determine the amount of alcohol that is in the blood. The sample is placed into a heated reaction chamber where it will vaporize, meaning that it will become a gas. The sample is moved through the stationary phase column. The elements in the sample separate while in the tube and at the end of the column. Each component generates there own individual electrical impulses that are recorded as a chromatogram of response versus the time. So a chromatogram usually turns out as a number of uneven peaks which can be identified by comparing the shape and time they came out with a reference chromatogram or a control sample. This test is just one of how the tests work and how they test for alcohol and drug levels in substances.
Cases Involving Drug Analysis:
On August 27, 2003 at the Gustaf Adolph Lutheran Church after service over two dozen members went to the recreation area for doghnuts and coffee, at first everything was normal, but in a change of events over a dozen members became violently ill, samples were taken from the members and sent to the toxicology lab of the Maine Public Safety Department. Over the next few day one of the churches oldest members Walter Reid died at the age of 78, the test that had been run on the coffee smaples determined that the cause of the illness and eath was arsenic poisining. Daniel Bondeson a member of the same church that Reid attended shot himself in the test and died during surgery, a suicide note was found in which he admitted to the crimes, he says that he only wanted to give evryone "bellyaches". This is an example of how something that starts out as a joke can turn serious when playing with harmful drugs.
Drug Testing Project:
Sources:
http://www.mshp.dps.mo.gov/MSHPWeb/PatrolDivisions/CLD/Toxicology/toxicology.html
http://www.trutv.com/library/crime/criminal_mind/forensics/toxicology/index.html
http://www.emeraldinsight.com/content_images/fig/0170950502002.png
http://www.bxscience.edu/publications/forensics/articles/toxicology/r-toxi01.htm
Tuesday, November 29, 2011
Part V: Lip Printing (Lipstick Activity)
History of Lip Printing: In was in 1930, that Diou de Lille developed some studies which led to lip printing being used in criminology. Lip prints were first recommended to be used in 1932 by Edmond Locard a French criminologist. In the 1960s Martin Santos suggested that the fissures and the criss-cross lines in the lips could be divided into different groups (simple and compound), and each group could be further divided into eight subtypes. The study of lipprinting has also been given the name cheiloscopy. In 1967 Suzuki made detailed investigations of the measurement of the lips, the use and color of lipstick, and methods to obtain useful data for forensic application. Later in 1970, K. Suzuki and Y. Tsuchihashi, conducted a study on Japanese families and named the grooves on labiorum rurorum as sulci labiorum and the lip prints consisting of these grooves as ' Figura linearum labiorum rubrorum '. There are many different types of classification for lip prints but listed below is that of Suzuki and Tsuchihashi.
Suzuki and Tsuchihashi Classifictation of Lip print:
Classification | Groove type |
Type I | Complete vertical |
Type I' | Incomplete vertical |
Type II | Branched |
Type III | Intersected |
Type IV | Reticular pattern |
Type V | Irregular |
Analysis and Recording a lip print:
In order to analyze a print often times different powders are used so that a photograph can be taken of the print. Aluminum powder, silver metallic powder, silver nitrate powder, and plumb carbonate powder are brushed over the print make visible and easy to analyze, using transparent overlays the print can even be traced. Plumb carbonate is a white powder that can be used with a brush over smooth, polished, and metallic surfaces. Because this powder is white it can not be used on white surfaces, in this case, marphil black powder or fat black aniline dyer are better choices since they both have a dark color. Silver nitrate can lead to positive results on non-ideal surfaces, such as untreated wood or cardboar. all of the powder listed above are used to lift lip prints.
Lip Priting In Class:
In order to study the print of lips as we did fingerprints each student used lipstick to make a print on a note card. A lip print, like a fingerprint i s unique to every person, this purpose in making our own print was to identify defining characteristics of our prints.
Sources:
Part IV: Footprinting
Information about Footprinting:
(2) Prints that are deep, short, and widely spaced, that have signs of scuffing or shuffling indicate the person was most likely carrying a heavy load
As a class we discussed how not only the size and shape of the print are important, but also which direction the print is directed, the type of soil that the print is in, and the weather outside also determine factors of the print. Along with these things the wear patterns of the shoe and walking patterns of the owner of the shoe. The size of the print even allows the detectives to be able to etimate the persons height, and the depth of the print the detectives to also estimate weight. Prints are made by leaving behind (blood, soil) or removing (dust, blood) material from a surface. Impressions are made in a material such as mud, sand or snow. When a footprint is found at a crime scene it can often be compared to another footprint found at another scene to deteremine f the same person may have comitted each crime. In order to preserve the print so that it can be used detectives often take pictures of the print so that it can be analyzed on a computer. There are often times when a cast is made of the print so that it can be duplicated later, in order to do this pour a dense liquid into the actual shoe imprint and allow it to set for a while. After the liquid solidifies, it can be picked up as one piece so that a replica will be available for future reference.
Analyzing Footprints:
(1) Often times if footprints are deep and the pace is long, rapid movement is apparent. Long strides and deep prints with the toe prints deeper than the heel prints indicate that the person was running

(3) Persons walking backward have a short, irregular stride, and have deep toe impression, and soil is displaced in the direction of movement.
(4) To determine the sex the sniper should study the size and position of the footprints. Women tend to be pigeon-toed, while men walk with their feet straight ahead or pointed slightly to the outside. Prints left by women are usually smaller and the stride is usually shorter than prints left by men.
Footprinting Project:
When my group and I did the project we had three females and one male, we determined that yes, gender does play a factor in the size of the print. Out of the group the male had the largest print size both in length and width. my group was also able to determine what kind of shoes that the person was wearing based on the print, this also played a factor in determining if the print was that of a female or male. for example, there was a girl in our group wearing boots when she made her print factoring in the size of the print and the mark of the heel of her boots we were able to determine that it was a female. The size of the print makes it look like the print is that of a male, then the print is so light (meaning that it the print isnt deep in the dirt) means that the male was most likley light weight.
Sources:
Sunday, November 20, 2011
Part III: Handwriting Analysis
History of Handwriting Analysis:
List of 12 Handwriting Characteristics
1. Line quality: Do the letters flow or are they written with very intent strokes.2. 2. Spacing of words and letters. What is the average space between words and letter
4. 3. Ratio of height, width, and size of letters: Are the letters consistent in height, width, and size?
Observe your ratios and record your findings. Measure short and tall letters.
6. 4. Lifting pen: Does the author lift his or her pen to stop writing a word and start a new word?
Observe the “lifting pen” habits and record your findings.
6. Strokes to begin and end: Where does the letter begin and end on a page?
Observe the “strokes” habits and record your findings.
7. Unusual letter formation: Are any letters written with unusual slants or angles? Are some letters printed rather than written in cursive?
Observe your “unusual letter formation” habits and record your findings.
8. Pen pressure: How much pressure is applied on upward and downward strokes?
Observe any “pen pressure” habits and record your findings.
9. Slant: Do letters slant to the left or right? If slant is pronounced, a protractor may be used to determine the degree.
Observe the “slant” habits. Use a protractor to record your findings.
1 (the image above show the handwriting characteristics of Bill Gates)
10. Baseline habits: Does the author write on the line or does the writing go above or below the line?
Observe any “baseline” habits and record your findings.
10. Baseline habits: Does the author write on the line or does the writing go above or below the line?
Observe any “baseline” habits and record your findings.
1 11. Fancy writing habits: Are there any unusual curls or loops or unique styles.
Observe any “fancy writing” habits and record your findings.
1 12. Placement of diacritics: How does the author cross the t’s or dot the i’s.
Observe any “diacritics” habits and record your findings for the top and bottom samples.
Pictures and Analysis of Handwriting Analysis Template:
The handwriting activity was a difficult process, each person handwriting is unique and matches that person personaltiy. Trying to immitate somebodies handwriting is almost like imitating that persons personality. When my partner and I where forging each others handwriting the difference in my original writing and her forged writing was noticable, my writing was more fancy and flowy than hers was. The tracing technique was easier than free hand forgery because my own handwriting techniques were not used because I was tracing rather than trying to write on my own.
Reflection on the Check Forgery Activity:
My group was able to identify which of the checks was a forgery. In order to forge my partners check I had to analyze their handwriting. This means that I had to observe unusual letters formation, slants, and spacing of words. All of these things are factors that are used to analyze handwrtiting, by determining these characteristics in my partners handwriting I was able to successful forge a signature, but it was easily distingiushable from the original.
Famous forgery case and explain how forensic handwriting analysis was used to expose the forgery:
The Howard Hughes Hoaxs: In 1970 Clifford Irving and Richard Suskind came up with a scheme to to forge an autobiography about howard Hughes a reclusive billionare. To them the plan seemed perfect, because Hughes was so reclusive the men believed that he would never denounce the book. Irving went to McGraw-Hill to publish the book claiming that Hughes has asked him to write the book, Irving even produced forged letters to the publishing company claiming the letters had been written by Hughes. McGraw-Hill agreed to publixh the book and gave Irving $765,000 for the rights to publish the book. When the book was made public Howard Hughes contacted reporters saying that all of this was false. Hughes would only speak to reporters on the phone so a "spectographic voiceprint analysis," a test that measures tone, pitch and volume, was conducted to determine if the speaker was in fact Howard Hughes. After running handwrtiing tests a handwriting expert was fooled by the notes that Irving had forged, but qith these notes combined with the voice, Irving was exposed and confessed before the book was published. He spent 17 months in prison, while Suskind spent five.
Sources:
http://myhandwriting.com/images/billgate.jpg
http://handwritinguniversity.com/barackobama/barackobama_handwriting.jpg
http://graphicinsight.co.za/background.htm
http://www.handwriting.com/facts/history.html
Sources:
http://myhandwriting.com/images/billgate.jpg
http://handwritinguniversity.com/barackobama/barackobama_handwriting.jpg
http://graphicinsight.co.za/background.htm
http://www.handwriting.com/facts/history.html
Friday, November 18, 2011
Part II Hair/ Fiber
History of Hair/Fiber Analysis:
Hair With Labeled Parts:
Major types of fibers (other than hairs), for instance, polyester, cotton, etc. Include at least 5 fibers:
1. Cashmere
Hair/Fiber collection techniques:If the pieces are big enough they can be picked with fingers and placed into a paper bindle, then a coin envelope to be labeled. Fibers can also be picked up with tape if the laboratory allows it, you may also places pieces of clothing (fibers) on
sheets of paper that can be rolled up and sent to labs. Hair can be collected with fingers or tweezers, if the hair is attached to an abject or blood it shouldn’t be removed from the object but both of these things should be taken together. In rape cases hair is generally taken by the person standing on a white piece of paper and coming through their hair in order to collect loose hairs.
Wayne Williams: From 1979-1981 someone was killing Atlanta’s youth, over 25 males and a few females were killed. The only real clue---which was valuable only if a suspect surfaced---was the presence on several of the bodies and their clothing of some kind of fiber threads. A few also bore strands of what was determined to be hair from a dog. The predator seemed to favor the Chatahoochee River so the police begin to watch it. Soon Wayne Williams is cot throwing a body into the river, the police obtain a search warrant for his home and car, fibers from the carpet in his home mach that found on the victims and he is tried for murder.
Sources:
In 1857 the first paper was written on hair analysis in France. One of the dirist scientific reports about Trichology, the study of hair, was written an introduced the idea of hair and fiber analysis. Professor John Glaister wrote "Hairs of Mammalia from the Medico-legal Aspect," which was published in 1931, it soon became a resource for hair analysis information and in 1977, John Hick's "Microscopy of Hairs: A Practical Guide and Manual" laid out the groundwork for the use of hair evidence by the forensic examiner.
Hair With Labeled Parts:
Major types of fibers (other than hairs), for instance, polyester, cotton, etc. Include at least 5 fibers:
1. Cashmere
2. Silk
3. Cotton
4. Rayon
5. Wool
This is an image of Rayon under a microscope, the green image below is silk.
Reliability of Hair/fiber crime scene:
Careful evaluation of hair and fibers found can place people at the scene of the crime and place the victim and suspect together, Although forensic hair analysis does serve as evidence in court, it does not necessarily serve as incontrovertible proof because in general, a hair comparison does not give complete recognition of an individual's identity.
Notable or famous case where hair/fibers were used to convict or exonerate a suspect.
Sources:
Part I Fingerprinting
History of Fingerprinting:
Types of Fingerprints:
In Class Printing:

In class we broke into groups of four so that we could fill out Modus Operandi sheets. We were given an ink pad and told to place each finger on the pad so that a small amount of the ink would be on each finger. Then very carefully we placed our thumbon the place on the sheet where it says thumb, then you roll the finger left to rght so that each print is taken evenly, the process is repeated for each finger, and the other hand. Then using the internet we researched the types of fingerprints and wrote down beside each of our own prints what type it was. The next thing that we did with the fingerprints was actually trying to lift one from glass using crushed lead.

When trying to lift fingerprints there are many ways that fingerprints are lifted. One method is through the use of different types of powders and a brush, using these supplies the person lifting the fingerprints physically dusts the surface. This technique allows the powder to stick tothe contaminates that cause ridge deposits. There are three types of brushes used for this mechanical process: fiberglass, camel hair, and feather. Black or gray powder is commonly used for lifting prints, the black powder is made of black carbon, or charcoal and is used on light colored surfaces, the gray powder is composed of aluminum dust and used for dark surfaces. This process is used for hard and smooth surfaces. Chemicals are also often used to lift prints, the oldest method is iodine fuming. The material with the print is placed in a closed cabinet with iodine crystals and heated, while being heated the vapors will combine with the constituents of the print making it visible. When the process is stopped the print must be photographed or sprayed with a one percent solution to starch in water, this turns the print blue. This process is used on porous nonabsorbent surfaces.
Sources:
In 1686 Marcello Malpighi, who was a professor of anatomy at the University of Bologna noticed the spirals, loops, and ridges that are on a fingerprint, though he never mentioned his discovery. Then in 1823 another professor of anatomy wrote a thesis about the nine types of print, this professor is credit for being the first to examine fingerprint using a microscope. In 1858 Sir William Herschel impressed his hand print on the back of a important document, he did this to keep others from reproducing his signature, pretty soon he began to do this for all documents. The first known use of fingerprints in the U.S. was by Gilbert Thomson in 1882 when he also began to use fingerprint on documents. In the 1880’s Sir Francis Galton began to study fingerprints as a type of identification, he wrote a book in 1892 discussing the difference in every ones fingerprints. Included in this book were the first classification types for fingerprints. Galton was credited for naming the five original details that are found in a fingerprint: dot, ending ridge, enclosure, bifurcation, and island. Juan Vucetich began the first fingerprint files in 1891 based on Galton’s patterns, Vucatich also made the first criminal fingerprint identification in 1892 from bloody fingerprints found on a door post.
Types of Fingerprints:
There are three types of fingerprints: direct, latent, and plastic. Direct fingerprints are prints that are left in a medium like blood that allows them to be seen with the naked eye. These prints become possible through when a finger comes into contact with a substance such as blood, ink, or grease and is then applied to a smooth surface, leaving behind a visible print. Latent prints are not apparent to the naked eye. These prints are formed from sweat from sebaceous glands on the body. The sweat creates a print that must be developed before it can be seen or photographed. Plastic prints are prints that have been left in soft surfaces such as clay, or paint. These prints are visible to the naked eye and can be viewed or photographed without being developed.
Basic Shapes and Patterns of Fingerprints:
There are other types of fingerprints that are shown in the pictures below: Accidental, Central Pocket Loop, Double Loop, Loop, Plain Arch, Plain whorl, tented arch.Line types (shapes): rod, ellipse, spiral, bifurcation, tented arch, loop, island, arch.
Techniques/chemicals used to develop prints on nonabsorbent, porous, hard, and smooth surfaces:
Sources:
Subscribe to:
Posts (Atom)